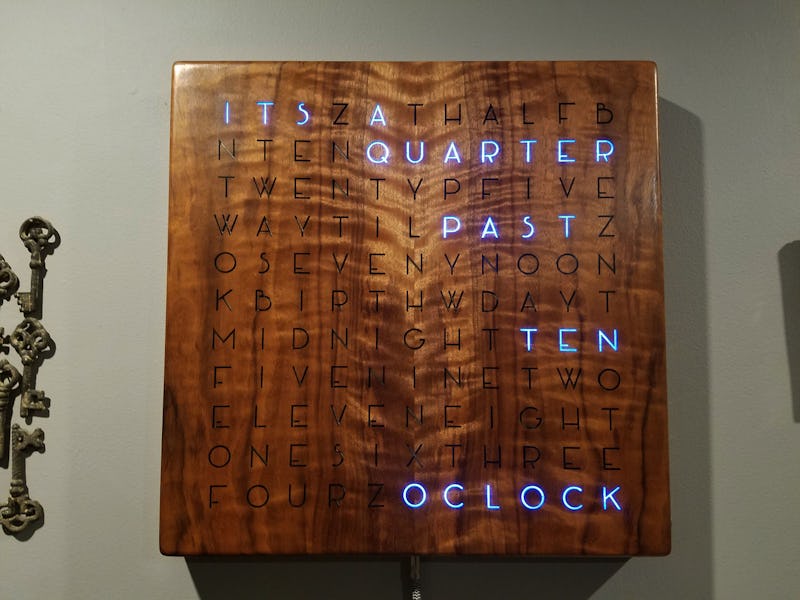
Making a Digital Wooden Clock Spell the Time
Brent Graham's clock is as unusual as it is beautiful.

It’s amazing what you can make with a blonk of acoustic guitar wood, a string of LED lights, and some basic coding knowledge. Surely someone with a healthy imagination could figure out various ways to employ these elements for a slew of DIY projects, but one Reddit user by the name of Brent Graham envisioned a state of the art word clock when he assessed his abilities and pondered the possibilities. Relying on his extensive knowledge of woodworking while expanding his previously untrained coding sensibilities, Graham created a smooth-running and multifaceted clock that made huge waves in the Redditsphere.
Before you stress out about your lack of coding knowledge, you should know that Graham began didn’t come to the project with very much experience. In fact, the DIY success began as a competition of sorts between Graham, who is experienced in woodworking, and his friend, who knows a thing or two about coding. “I talked to him about a week later after that and he was like, ‘Hey I’ve got mine all coded up, how’s yours going?’ And I was like, ‘I haven’t even started yet.’” That’s when Graham began cracking down on the coding aspect of the project.
The clock also displays the time in large numerals
Graham’s word clock is controlled by an arduino and a piece of open-source software that allowed him to code the clock once he found the appropriate code online. Whenever he reached a coding impasse with the arduino, Graham would watch Youtube tutorials or talk to Redditors about how to proceed. “Every single step of the way I was like I have no idea how to do this let me see if I can google this to figure it out,” Graham said. And he always did figure it out. Graham hopes his project indicates the amazing feats people can accomplish with a little bit of research on the internet.
With the way Graham’s clock is currently set up, there are four different display possibilities controlled by a button on the side of the machine. Normally the clock displays the time in words, but hit the button once and the LEDs will form numbers that flash between the hour and minutes. Hit the button again and you’ll see days and months displayed, and with one more click a secret message pops up—“Happy Birthday.” Figuring out how to set up these alternating displays was certainly not in Graham’s repertoire, but arduino experts on Reddit saved him once again.
The clock also displays the date
After finding his bearings in the coding part of the project, Graham embarked on the construction process, a walk in the park given his woodworking experience. To his surprise, acoustic guitar wood ended up having the perfect size, shape, and appearance to give Graham a polished finished product. Then he applied the string of LED lights in a zig-zagging, 11x11 pattern to match up with the 11x11 matrix of letters he found online to spell out the different times that would be displayed on the clcock. He used medium density fiberboard to create dividers between the lights so the color doesn’t bleed from one letter to the next and spray painted the dividers silver to illuminate each cubby evenly.
If you refer to Graham’s Reddit post, you’ll find the remaining steps of the construction process, including laser cutting the letters, pouring epoxy, and building a frame for the clock. Once the model was completed, it was only a matter of applying the appropriate code to the arduino for control over the LED lights. He found a code on Adafruit that accommodated the snaking path of the LEDs, and with some additional tweaks here and there, the finished product was hanging on his wall.
With so many different parts to the project, Graham said it’s important to map out everything before you make any irreversible cuts or coding decisions. “The old adage ‘measure twice cut once’ kind of sums it all up,” he said. Even with an incredible finished product that’s garnered attention on the Internet, he still wants to make more adjustments to the code so that the three buttons have discrete functions. But that comes at a later time. At least now he knows with proper planning and plenty of help from online geniuses that any DIY project is possible.