Guides
How to start a Discord server
Here’s everything a brand new Discord community needs to thrive.
Discord started off as chat software but has branched out over the past year and now includes all sorts of communities. Folks are flocking to servers centered around sports, their favorite musicians and niche hobbies. Workplaces and family chats have even started moving to the platform.Looking to start your own server for your friends or an online community? Discord is a big place but creating your own space is simple. I’ll show you how.
How do I start a Discord server?
Assuming you’ve set-up your Discord account already, creating a new server is pretty straight-forward. You can start a new server on the mobile app, desktop app or in your browser. I’m going to build a server using Discord in Chrome, but these steps are identical on every platform.


- First, find the green plus symbol button on the left-hand sidebar. This “Add a Server” option will appear under existing servers you’re a member of, so it’ll be toward the bottom of the sidebar if you’re already active on Discord.
- You’ll be given the option of starting a completely fresh server or choosing from a list of popular templates like “Gaming” and “Study Group.” Templates generate a handful of channels to kick-off your server and keep it organized. Of course, you can add and delete channels from these templates to customize them. You can also find user-created templates through third-party sites.
- When you’ve picked a template, you’ll be asked whether your server is for you and your friends or a community. There are subtle differences to the template depending on which you pick — if you choose the community option, it might be created with a “Rules” or “Announcements” channel for a more official vibe, for example. Ultimately, it doesn’t matter which you pick. You can also skip this question to get a more default template.
- Next, you’ll be asked to name your server and upload an icon to give it a bit of personality on everyone’s server list.
- Click the “Create” button to launch your brand new Discord server!
How to make a good Discord server
Creating a Discord server is step one — now we’ve got to build a community, add all the cool features we can and make sure everything runs smoothly.
Organize your channels
Once your Discord becomes a little more popular, you might notice a lot of off-topic discussions. Instead of bringing out the ban hammer, try to organize your channels in a way that fosters that kind of conversation, but in the right place.
You can right-click on any channel to bring up an edit option. Here, you can write a brief description for each channel, outlining what its for any rules you might want to have inside.
You can also right-click a blank space in the channel sidebar to find an option to add categories. This is great if you have a large server where discussions branch out on several different topics.
You can rearrange and customize the look of your channels list by dragging and dropping individual channels.
Assign roles (and maybe choose some moderators)
Well-run Discord servers often have different tiers of leadership roles, each with different permissions on the board. You may want to give a few serious users the ability to create new boards or edit channels, or let your most active users become moderators to enforce the rules and set troublemakers straight. Here’s how to create roles, assign users and edit permissions:

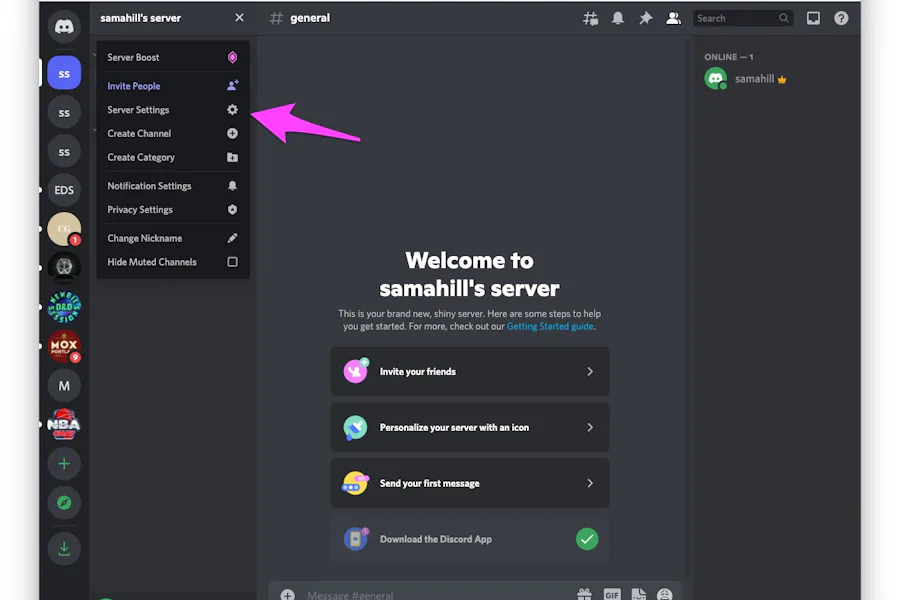

- On your server, locate the server name in the top right-hand corner of the screen and click the caret to the right
- Click “Server Settings”
- In the right-hand sidebar, click “Roles”
- Find and click the “Create Role” button
- Here, you’ll be asked to name the new role and decide how the new role title will be displayed when you assign it to users.
- Above, navigate to the “Permissions” tab where you can choose exactly how much power users with this role have on your server. There are a lot of different options — make sure you know exactly how much authority you want to give someone on your server before doling out permissions.
- Navigate to the “Manage Users” to easily search the server’s userbase and assign the role to whoever you see fit.
You can always return to these settings and alter roles at any point. You’ll never have to alter your own permissions — you have access to everything. In this settings menu, you can also edit the default settings for everyone on the server. Find the @everyone role in the list of roles and you’ll be able to edit those permissions. Roles are used to divide up permissions, but they’re also fun. You can build roles for really active users or helpful community members to give them a treat for contributing to the server. These don’t need to come with special responsibilities. It can just be a cool nickname, like a Discord employee of the month designation.
Add bots
A small team of bots is a must-have on any busy Discord server. Bots can automate a lot of regular tasks on a server, like reminding users of rules, playing music in voice channels, or helping newcomers navigate the channels. Dealing with bots may sound super techy and complicated, but there are a slew of helpful bots available online for free and adding them to your server is a breeze.
While Discord doesn’t keep its own list of public bots, there are a few places that keep track of the best available bots. Bots on Discord and Top.GG are the best libraries to search through. There are a lot of options. Check out the most popular bots, search for something specific or just browse aimlessly until you find one you want to try out.

I’m going to add a popular moderation bot called ProBot to my server and try setting up some rules on my server. Here’s how to add a bot:
- Once you find a reputable bot you’d like to add to your server, there will be a clear option to “Add” or “Invite” the bot to your server, depending on where you discovered it. Click that!
- This should open up a pop-up window or new tab that explains exactly what permissions you’re giving the bot and asking which server you’d like to add the bot to. Pick your server from the drop-down list and click “Continue”
- You’ll be asked to confirm the permissions you’re giving the bot. Definitely read this list. If you’re only adding popular bots, there won’t be any trouble, but a music bot that wants permission to kick users might raise eyebrows. Once you’ve reviewed this list, click “Authorize.” The bot is now on your server!
Believe it or not, my little test server does not need an advanced admin bot. ProBot opened up a big dashboard upon joining my server with user charts, role organization — all sorts of tools that I just don’t have room for. No problem! Deleting a bot from your Discord server is just as easy. I just found ProBot in my user list, right-clicked and chose to kick it off the server. Just as quickly, I added another bot called MEE6 to my server and got exactly what I needed — this bot will now greet anyone new who joins my server!
All Discord bots operate differently. Some will live only on your server, while others give you access to completely separate dashboards. Most Discord bots come with instructions and are designed to be easy to use. It takes some experimentation to figure out what bots will work best for your server but trust us, adding and editing them until you find the right one isn’t as scary as it sounds.
These moderation bots had a lot of customization options but others, like this cute HaikuBot, just pulls out accidental haikus and requires zero settings adjustments.
I’d recommend digging through the top-rated bots on the sites listed above or running some searches on Google or Reddit for “Best Discord Bots for X” to find what you want.
These are the absolute must-haves for a good server. Once you’ve got the basics down, you may want to dive even further into customizing your Discord server. If you’re looking for next steps beyond this guide, I’d recommend looking into integrations you can set-up, to automate alerts when you update your Youtube channel or another related server makes a big change. You can even get into making your own bots. Good luck with your server!
