Guides
How to scan documents as PDFs directly into the Notes app on iOS
Easily digitize health records, work documents, and more with Apple’s hidden scanner.
Keeping track of and storing physical documents can be a pain. Health records get mixed up with work contracts, your tax document folder has some stray business cards floating around in it, and those handwritten notes from friends and family always tend to go missing.
You should really be digitizing a lot of your documents. Saving your records digitally saves space in your home and storing them somewhere password-protected (maybe an authenticator-enabled storage service) is a lot more secure than that accordion folder you keep tucked away.
Don’t worry though. You don’t need a special scanner to start moving documents to the cloud. If you’re an iPhone user, Apple has a secret document scanner hidden away in its Notes app.
How to scan documents into the Notes app
The scanning process only takes a second, but there are a few tips and tricks to the Notes app that you should know before diving in that’ll make it a lot smoother. We’re scanning a document using an iPhone 13 Pro, but you can also use an iPad, or iPod touch.

- Open the Notes app on your iPhone.
- Create a new note by tapping the compose icon in the bottom right-hand corner of the screen.
- When you create a new note, the keyboard and a toolbar will pop up in the bottom half of your screen. On the toolbar, tap the camera icon and select “Scan Documents” from the menu.
- Your camera will activate and you’ll be prompted to position the document you’d like to scan in front of the camera. Hover your phone over your document. Your camera will search for things to scan, displaying a semi-transparent yellow box over sections of the document. When the camera has a good view of the entire document, it will capture and save a scan of the document automatically. If you have multiple pages to scan, you can repeat this step.
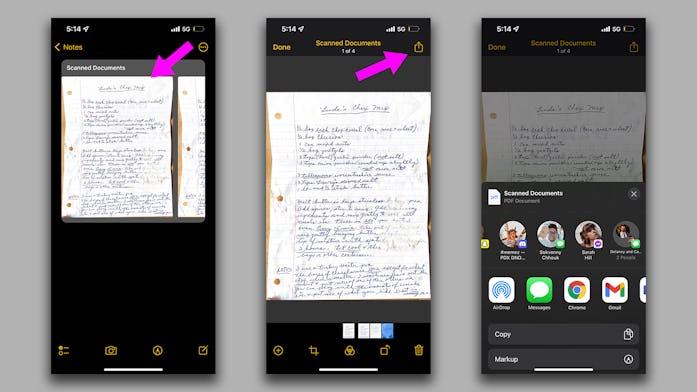
- Once you’re done scanning all of your pages, you can tap on the thumbnail in the bottom left-hand corner to preview your scans. You can crop, rotate, or add a few filters to your image. If you don’t like the look of a scan, you can tap “Retake” in the upper right-hand corner to shoot a specific page again. You can tap “Done” in the upper left-hand corner to return to the capture screen.
- If you’re content with your scans, tap “Save” in the bottom right-hand corner of your capture screen. You’ll be whisked back to the composition screen where you can add additional notes to your document if you’d like. Tap “Folders” when you’re finished to return to the main Notes menu.
Your scanned document will now be listed alongside the rest of your saved notes. To access the PDF of your scan and share it elsewhere, you can sync your Notes app to your iCloud storage and find the PDF later on the web or send it directly from the Notes app on your phone.
- In your Notes app, select the note(s) you just created with the scanned document.
- Tap directly on the image of the scanned document. This will bring up an editing screen.
- Tap on the share icon in the top right-hand corner of your screen. This will bring up the same sharing options you’d see if you were sharing a photo or a link. Just pick a contact you’d like to send the PDF to and fire it off.
A few tips for clear scans
I scanned a hand-written note above and wasn’t too worried about the quality of my document scan. If you’re scanning a more important document, like a file for work or a personal record, you’ll want to make sure your new PDF is neat and easy to read. Here are a few tips for improving your scans.
- Good lighting is an absolute must. You can scan a document with a newer iPhone in low-light but it’ll never look as good as a scan in a more well-lit environment. Soft, natural light near a window is going to be best, followed by bright overhead lights. If you find the right balance, your scan will just look like a digital document straight from a word processor.
- The automatic scanning mode is great, but it can be a little overwhelming when your phone starts capturing copies of your document before you’re ready. You can turn off the automatic mode by tapping “Auto” in the top right-hand corner of your screen while in capture mode. This will move you to a manual mode where you have a bit more control over capture timing. Just tap the capture button in the center like you would taking a photo when you have your scan lined up.
- By default, the flash for document scanning is set to automatic. If the flash is washing out your document or not firing when you think it should, you can toggle the flash on and off by tapping the lightning icon on the capture screen.
